Fit calculator | Tools for fits and tolerances
- Details
- Hits: 26525
Do you want to adjust components with millimeter precision? The fit calculator helps you calculate fits and tolerances ISO 286. to calculate. Discover how nominal dimensions and tolerance classes are converted into a perfect fit and how you can work more efficiently with this tool. We provide you tolerance calculator various companies. This ISO Online of fits promise precise results and simplify your design work.

Contents
- Calculate ISO tolerances and fits online
- Basics of ISO fits: Understanding the standards
- Three fit calculators for your design
- Frequently asked questions
Calculate ISO tolerances and fits online
You want Adjust components with millimeter precision? The fit calculator helps you to easily calculate fits and tolerances according to ISO 286. Discover how nominal dimensions and tolerance classes are converted into a perfect fit and how you can work more efficiently with this tool - for components that fit exactly as they should.
Key facts at a glance
- An online fit calculator makes it easier for designers to calculate precise fits and tolerances in accordance with the international standard ISO 286 and helps to increase efficiency Error minimization in the construction process.
- DIN EN ISO 286 defines the tolerance system for Limit dimensions and fits and enables precise specifications for the design of components such as shafts and bores through various tolerance levels and fit types.
- The use of digital fit calculators saves time, improves the accuracy of design work and can... CAD software be integrated to simplify the design process and increase product quality.
Basics of ISO fits: Understanding the standards
The DIN EN ISO 286 is an international standard that defines the tolerance system for limit dimensions and fits. It applies to sizes from 0 mm to 3150 mm and is based on the basic tolerances and tolerances of the ISO tolerance system. An online fit calculator can help apply these standards and calculate precise fits and tolerances.
There are different types of fits within this standard, viz Gamefits, crossingfun and Excessfits. Each type of fit has specific requirements and applications that are set out in DIN 7157. Selecting the correct fit type is critical to the successful design and assembly of components.
The tolerances in DIN EN ISO 286 are through 20 degrees of tolerance in which numerical values for the tolerance range are specified. This allows designers to calculate fits and tolerances with high precision and ensure that their designs comply with international standards such as ISO 286-2.
Three online fit calculators for your design
Discover the tolerance calculator from Igus, Spanflug and Facturee. This online of fits promise precise results and simplify your design work. Find out about new software solutions, find answers to your questions and find out how you can optimize your workflows.
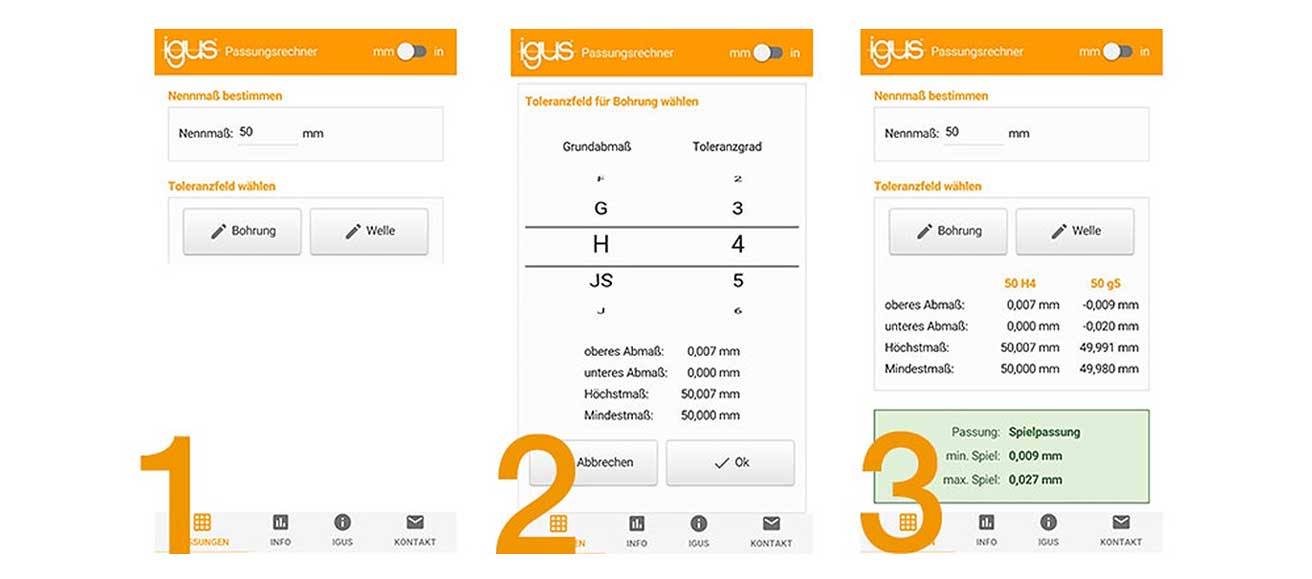
In modern manufacturing technology are precise fits decisive. The right fit calculator can make all the difference when it comes to efficiency and accuracy. With its technology-driven approach, igus offers a fit calculator that is tailored to industry standards and leads to the optimal fit in 3 steps. Spanflug, on the other hand, scores with its integration into the design workflow, while Facturee impresses with its user-friendly interface and quick results. Discover the variety and advantages that these tools offer and optimize your development process.
Fits online according to ISO 286 from Spanflug
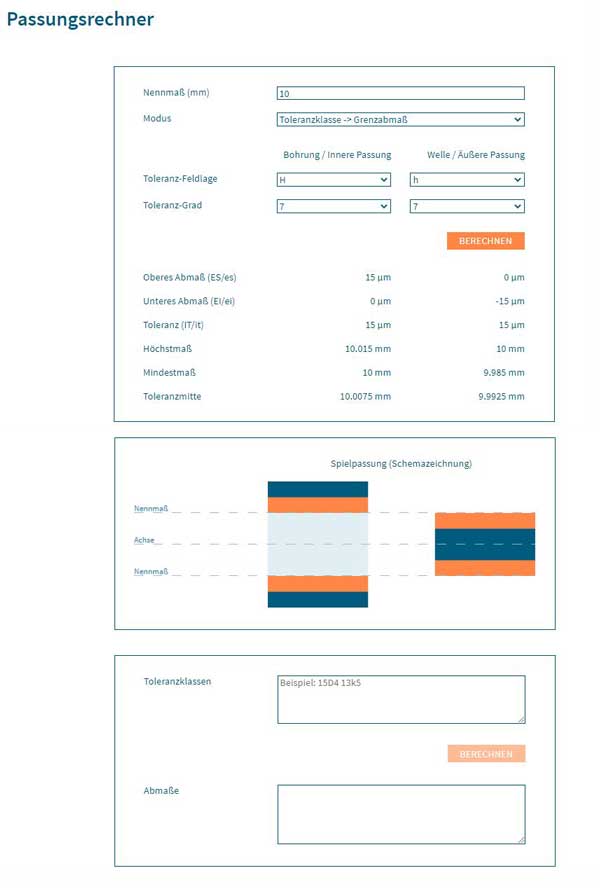
 19.08.2023 | flying chips introduces its new online fit calculator for CNC components before. This allows designers to obtain lightning-fast results for specific types of fits, dimensions and tolerances. You simply enter the desired nominal bore size and the required fit. The advanced software immediately determines all relevant values, including upper and lower dimensions as well as the tolerance center.
For even more efficiency, the software includes the options "System unit bore" and "system unit wave". These are particularly suitable for the production of parts in small quantities, as is often the case in tool and large machine construction. With just a few clicks, the desired type of fit such as oversize, transition or clearance can be selected and the nominal size can be changed to the corresponding one Enter the field and the user will promptly receive suitable suggestions for bore and shaft.
dr Markus Westermeier, managing director and co-founder, emphasizes: "Our new fit calculator is an additional service for designers and manufacturing companies. Further digital helpers are planned. Our next practical online calculator is already in the starting blocks."
Simple, snake fit calculator from igus

22.11.2022/XNUMX/XNUMX | The CAE digitization pioneer Igus offers a fitting calculator, which he himself classifies as simple and lean. With this, you can quickly and easily calculate fits and tolerances according to ISO 286. In addition to the maximum and minimum dimensions, the software also shows the associated type of fit. With the registration-free tool, users receive the maximum and minimum of their constructive query in just three steps. You just have to do the following:
- nominal size enter between 0,01 and 500 mm,
- tolerances enter for bore and shaft,
- costs easily to let
Fit Calculator and Roughness Converter by Facturee
 28.03.2021 | facturee presents two free online tools to calculate a fit according to ISO 286: a fit calculator (tolerance calculator) with bulk editing function and reciprocal calculation and an Rz/Ra roughness converter. The ISO 9001 certified online manufacturing network is dedicated to easily sourcing CNC, sheet metal and 3D printed specialized in parts.
The calculator can report the maximum tolerances for a given nominal size and type of fits. The roughness calculator can Ra to Rz values in all directions and thus delivers more precise results than before.
The Surface roughness is an important factor in manufacturing as it affects wear resistance, frictional forces, lubrication, noise levels, paint adhesion, corrosion protection and much more. The Rz/Ra roughness converter simplifies the process of converting between Rz values (average peak-to-valley height) and Ra values (arithmetic mean deviation).
Tolerance calculator with quantity processing and reciprocal value
Fits and tolerances are important in manufacturing as they help determine the accuracy of the assembled components. This calculator simplifies this process by using the maximum tolerances for a specific nominal size and type of fit.
He can too Mengen calculate based on reciprocal calculations from one part to another. This allows the costs associated with machining parts to be estimated quickly and accurately. For the first time, the optimized tool offers a quantity processing function and a reciprocal calculation.
Frequently asked questions
- What is a fit?
- How is a fit determined?
- What types of fits are there?
- What fit is H7?
- What fit is h7?
- What 3 tolerances are there?
- How can you calculate tolerance?
What is a fit?
A fit is a ratio of two workpieces subject to tolerances (tolerances) that have an identical nominal size but different tolerance fields in terms of size and position. For example, permissible actual dimensions of shafts and bores to be connected are defined using fits. Tolerances and limit dimensions are defined in DIN ISO 286 1:2010 and DIN ISO 286 2:2010. There are the following fits:
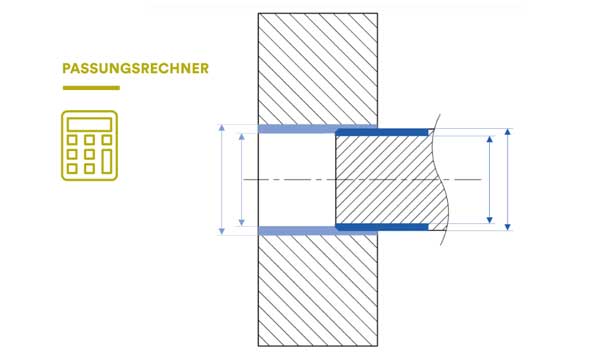
- Within the clearance fit the maximum dimension of the shaft is smaller than the minimum dimension of the bore.
- Within the interference fit or interference fit, the minimum dimension of the shaft is larger than the maximum dimension of the bore.
- The transition fit depends on the actual dimensions and is either a clearance or an interference fit.
How is a fit determined?
The Calculation of a fit is usually carried out using a fit calculator. The ISO tolerance system plays an important role here. It defines tolerance classes that are used throughout the manufacturing industry. These tolerances are limit dimensions that determine the maximum and minimum dimensions of a component. In order to calculate a fit, the nominal dimensions are first determined. Then you select the tolerance classes from the ISO tolerance system that correspond to the requirements. Finally, use the Fit Calculator to determine the exact tolerances.
What types of fits are there?
The fit types are important in different applications depending on the assembly, maintenance and function requirements of the component. There are three main types of fit:
- Interference fit (Overfit): The shaft is larger than the bore so it must be pressed in. There is always an excess.
- clearance fit: There is free play between shaft and bore. The shaft is smaller than the bore.
- transition fit: Depending on manufacturing tolerances, there may be a slight oversize or play. The shaft can be either smaller, the same size or slightly larger than the bore.
What fit is H7?
The fit "H7" refers to a tolerance range for holes in mechanical engineering. The "H" stands for a basic hole with a lower dimensional tolerance of zero. The number "7" indicates the specific tolerance field. An H7 fit provides a smooth fit for shafts that allows the shaft to slide into the bore without much resistance.
What fit is h7?
The fit "h7" refers to a tolerance field for shafts in mechanical engineering. The "h" denotes a shaft and the number "7" indicates the specific tolerance field. With an h7 fit, the shaft has a slight oversize tolerance, so it usually slides easily into a hole.
What 3 tolerances are there?
There are three main tolerances when it comes to fits and technical drawings:
- Basic tolerances refer to general deviations that are permitted in manufacturing processes. They are usually given in table form for different tolerance classes.
- Form tolerances describe the permissible deviation of a component from the ideal shape, for example roundness, straightness, flatness, cylindricity, profile of a line and profile of a surface.
- Location or position tolerances define the permissible deviation of the actual position of a component from the theoretical ideal position, for example parallelism, perpendicularity, symmetry and coaxiality.
Depending on the context and level of detail, additional tolerance types and subcategories may exist.
How can you calculate tolerance?
Calculating tolerances depends on the context and specific requirements of the particular project or design. In general, tolerance is defined as the difference between the maximum allowable dimension and the nominal dimension. Here are basic steps to calculate tolerance:
- Determine that nominal dimension: This is the desired dimension specified in technical drawings or specifications.
- Determine that upper and lower limit: These are the maximum and minimum dimensions that are acceptable for the component.
Calculate the tolerance:
- Upper tolerance = Upper limit – nominal measurement
- Lower tolerance = Nominal measurement – lower limit
There are different tolerance classes and standards that can vary from industry to industry. Some standards, such as ISO or DIN, provide tolerance tables for different tolerance classes that can be selected depending on accuracy requirements.

Jens Struck is a business owner, journalist and web designer at German Online Publisher GbR in Ried.
